Bathrooms are one of the most important rooms in your house. It’s where you start your day and where you wind down at night. But when a bathroom becomes old, dark, and outdated, it can feel more stressful than relaxing. That’s exactly what happened with this bathroom in a home located in Morristown.
What once felt dull and worn out has now become a bright, beautiful, and comfortable space. With careful planning, skilled work, and attention to detail, this bathroom was completely transformed into something the homeowners truly love.
Let’s walk through the full remodel and explain everything that changed.
The Old Bathroom – What Needed to Change
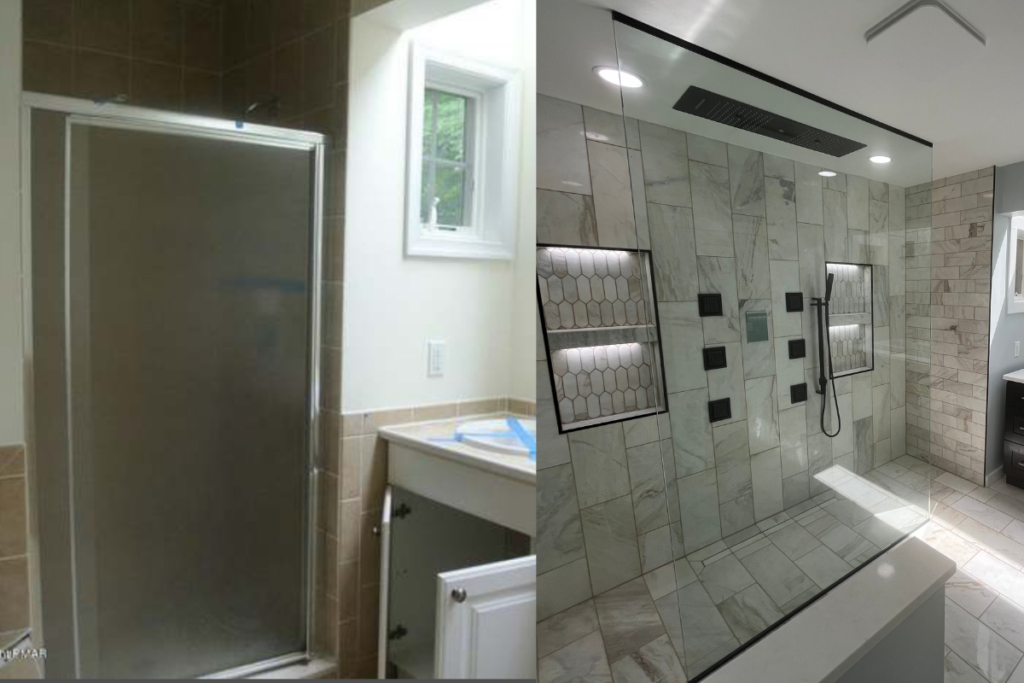
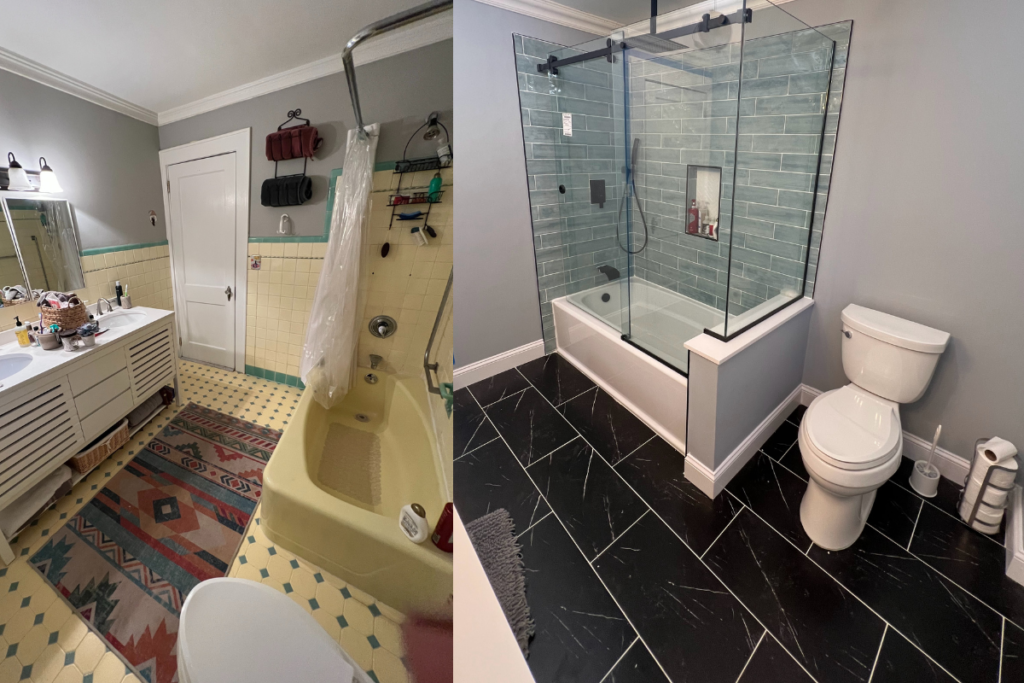
The bathroom before the remodel had brown and orange tiles everywhere. The floor, the walls, and even around the toilet were covered in big brown tiles. It also had dark wood cabinets. The shower didn’t feel very special. The lighting wasn’t great either. It looked like a bathroom from many years ago, and it needed a fresh new look.
The goal was to make this bathroom bright, clean, modern, and easy to use. The homeowners wanted a big shower, a pretty vanity, new tile, and better lighting. So, we got to work!
")
")
Demolition – Taking Everything Out
The first thing we had to do was remove everything from the bathroom. That’s called “demolition.” We took out the old toilet, the old vanity, the wall tiles, and the floor tiles. We had to tear down everything.
This step is super important because you can’t build something new without clearing out the old stuff first. Once everything was taken out, we had an empty space to start fresh.
Building the New Shower
Next, we worked on building the new shower. The homeowners wanted a custom shower that felt like a spa. So, we made sure to do everything carefully and correctly.
Cement Board Walls
First, we covered the shower walls with cement boards. Cement boards are strong and water-resistant, which makes them perfect for showers. We also built a shower “niche.” A niche is a little shelf built into the wall so you can keep your shampoo, soap, and other shower things.
Taping and Waterproofing
Once the cement boards were up, we covered all the seams and holes with special tape. After that, we painted the walls with something called Redgard. Redgard is bright red and acts like a raincoat for your shower. We painted two thick coats so that no water could ever get through the walls. This step is very important because it keeps the shower from leaking or getting moldy.
Custom Shower Pan
We also built a brand-new custom shower pan. The pan is the bottom of the shower where the water drains. We used a Schluter shower system to make sure the entire shower, from the walls to the floor, was 100% waterproof. This system is one of the best ways to make sure your shower will last a long, long time.
")
")
Fixing the Heating
In the middle of the project, we ran into an unexpected problem. The homeowners wanted to shorten the baseboard heating in the bathroom, but when we tried, we discovered that some parts of their heating system were broken.
We had to replace the expansion tank and the pressure-reducing valve. We also drained and refilled the entire heating system. This was a lot of extra work, but it was worth it because now their heat works even better than before!
Fixing the Floor
When we were working on the main floor of the bathroom, we noticed something else. The floor had a big dip in the middle! That’s called a “bowed floor.” This is a problem, especially when you want to lay small tiles like we were going to.
If we didn’t fix the floor, the new tiles would have looked bumpy and uneven. So, we showed the homeowners and explained why it needed to be fixed. They agreed, so we used something called “self-leveling cement” to make the floor perfectly flat.
Tile Work – The Big Transformation
Once the floor was flat and ready, it was time to install all the new tiles. We used small square mosaic tiles for the shower floor and the main bathroom floor. These tiles came in big sheets, but many of the little squares were crooked.
Most contractors would just install the sheets without fixing them, but we wanted this bathroom to look perfect. So, we carefully checked every sheet, took out the crooked squares, and fixed them one by one. It took a lot of time, but the final result was beautiful.
For the shower walls, we used large gray tiles with a modern, marble-like design. We installed them in a staggered, vertical pattern that made the shower look taller and fancier. We also built a custom stone shelf inside the niche and matched it with the stone thresholds at the shower entrance and the bathroom door.


Making the Vanity Shine
The homeowners wanted to keep their original vanity, but it needed a makeover. So, we took the vanity off-site and refinished it. We painted it a lovely deep blue color and added new filler pieces and a longer toe kick. Originally, the vanity didn’t reach all the way to the wall because of the old baseboard heater, but now it fit perfectly from wall to wall.
Once the vanity was back in place, we took the homeowners to a stone yard so they could pick out their favorite countertop. They chose a beautiful white slab with soft gray veins. We also used matching stone to make a new window sill.
Fresh Paint and Trim
We added brand new drywall to the main bathroom walls and gave everything a fresh coat of spackle and paint. On the lower half of the walls, we installed fancy wainscoting with a board and batten design. This added a lot of character and made the bathroom feel cozy and elegant.
We also added a new mirror with a wood frame, fresh wall art, and updated the lighting with modern, bright ceiling lights.
")
The Final Result – A Bathroom You’ll Love Every Day
The finished bathroom looks like something you would see in a magazine. The brown, old-fashioned tiles are gone. The new gray and white color scheme is clean, modern, and bright. The shower is huge and feels like a spa, with beautiful tiles, a rainfall shower head, a handheld shower, and even a safety grab bar.
The new vanity looks amazing with its deep blue color and shiny white countertop. The small floor tiles tie everything together and give the room a sleek, polished look.
Most of all, the bathroom now works perfectly. The floor is flat, the heat works great, and everything is waterproof and built to last.
The Best Part – A Happy Homeowner
One of the best parts of this project was seeing the homeowner’s face when everything was done. The wife was so happy and told us how much she now loves using her bathroom every day. That’s what makes this job special. You use your bathroom every single day, and when it’s a place you truly love, it makes a big difference.
Why This Remodel Was Special
This project wasn’t just about making a bathroom look better. It was about fixing problems and making sure everything worked properly. We made sure every little detail was right, even when it meant doing extra work like fixing the floor or replacing broken heating parts.
The homeowners trusted us to turn their old, outdated bathroom into something beautiful and special—and we did just that.
Final Thoughts
A bathroom remodel is a lot of work, but when it’s done right, it can change the way you feel every time you walk into the room. This Morristown bathroom went from dark and old to bright, clean, and modern. The new shower, vanity, tile, and fresh paint made it a space the homeowners will enjoy every single day.
If you’re thinking about remodeling your bathroom, remember that it’s not just about looks. It’s about making your space safer, easier to use, and something you can be proud of. And when you do it right, like we did here, the results are worth every bit of effort.